
Loading data when using Label Studio can be accomplished in various ways. The easiest one is to drag and drop a file into the interface, but this is not always the best option, scpecially when dealing with large datasets.
In this post we will see how to load data from a JSON file, configuring the Label Studio server to serve the files from a local directory.
Label Studio Setup
The first thing we will need to do is to run the Label Studio server. We can do this by running the following command in the terminal:
docker run -d -p 8080:8080 \
--env LABEL_STUDIO_LOCAL_FILES_SERVING_ENABLED=true \
--env LABEL_STUDIO_LOCAL_FILES_DOCUMENT_ROOT=/label-studio/files \
-v /datadrive/labeling/myfiles:/label-studio/files \
--env LABEL_STUDIO_DISABLE_SIGNUP_WITHOUT_LINK=true \
--env [email protected] \
--env LABEL_STUDIO_PASSWORD=test \
--name label-studio \
--restart=always \
heartexlabs/label-studio:latest label-studio
Here we are running the Label Studio server in a Docker container,
specifying that we will use the local storage. We are also mounting a local machine directory
/datadrive/labeling/myfiles to the container’s /label-studio/files directory,
so that we can access the files from the container. The main parameters for local file serving are:
LABEL_STUDIO_LOCAL_FILES_SERVING_ENABLED=trueenables the local file serving feature.LABEL_STUDIO_LOCAL_FILES_DOCUMENT_ROOT=/label-studio/filessets the container’s root directory for the local file serving feature.-v /datadrive/labeling/myfiles:/label-studio/filesmounts the local directory/datadrive/labeling/myfilesto the container’s/label-studio/filesdirectory, so that we can access our local machine files from the container.
We are also setting some interesting parameters for the Label Studio server:
LABEL_STUDIO_DISABLE_SIGNUP_WITHOUT_LINK=truedisables the signup feature, so that only users with a signup link can register (we can obtain the signup link when log in with the defined user).[email protected]sets the username for the user that will be created.LABEL_STUDIO_PASSWORD=testsets the password for the user that will be created.
When we run the command above, we will see that the Label Studio server is running in http://localhost:8080.
Remember to change the path /datadrive/labeling/myfiles to the ones in your local machine.
If you can access the server and see the login page, we are ready to go!
Labeling configuration
For this example we are going to work simulating a problem in which we want to annotate the class to which an image belongs, obtaining a configuration similar to the following one:
<View>
  <Image name="image" value="$my_image"/>
  <Choices name="choice" toName="image" showInLine="true">
    <Choice value="Boeing" background="blue"/>
    <Choice value="Airbus" background="green" />
  </Choices>
</View>
Note that the value field from the Image component is the key that we will give later to the reference of the data we want to label.
So, once the login is done, we will go to Create Project, give it a name,
pass for the moment from the Data Import section,
and finally at Labeling setup define our custom template as we have indicated.
Data Structure
For the post, we mounted the local directory /datadrive/labeling/myfiles to the container’s /label-studio/files directory.
The structure of the files in our local direcotry is the following:
/datadrive/labeling/myfiles
└── dataset
    ├── 1.jpg
    ├── 2.jpg
    └── 3.jpg
Loading Local Files
In the case that we have a large dataset of files in our local machine or server,
we can use the local file serving feature of Label Studio to load those local files.
To do so, we only will need to mount our local directory to the container’s /label-studio/files directory,
through the -v parameter in the docker run command from Label Studio Setup.
Then, to use our local files in the labeling, we will need to:
- Setup the local file serving feature in the Label Studio project configuration.
- Create a JSON file with the data we want to label.
- Load the JSON file in the Label Studio project.
Local File Serving Setup
For the local file serving feature to work, we will need to setup it in Label Studio project configuration.
To do so, we need to go to the project Settings, then to Cloud Storage and finally to Add Source Storage.
There we will need to fill the following fields:
- Storage type:
Local files - Absolute local path:
/label-studio/files/dataset
If we click Check Connection we should see a green message indicating that the connection is successful.
We can then click Add Storage and we will have our local file serving setup.
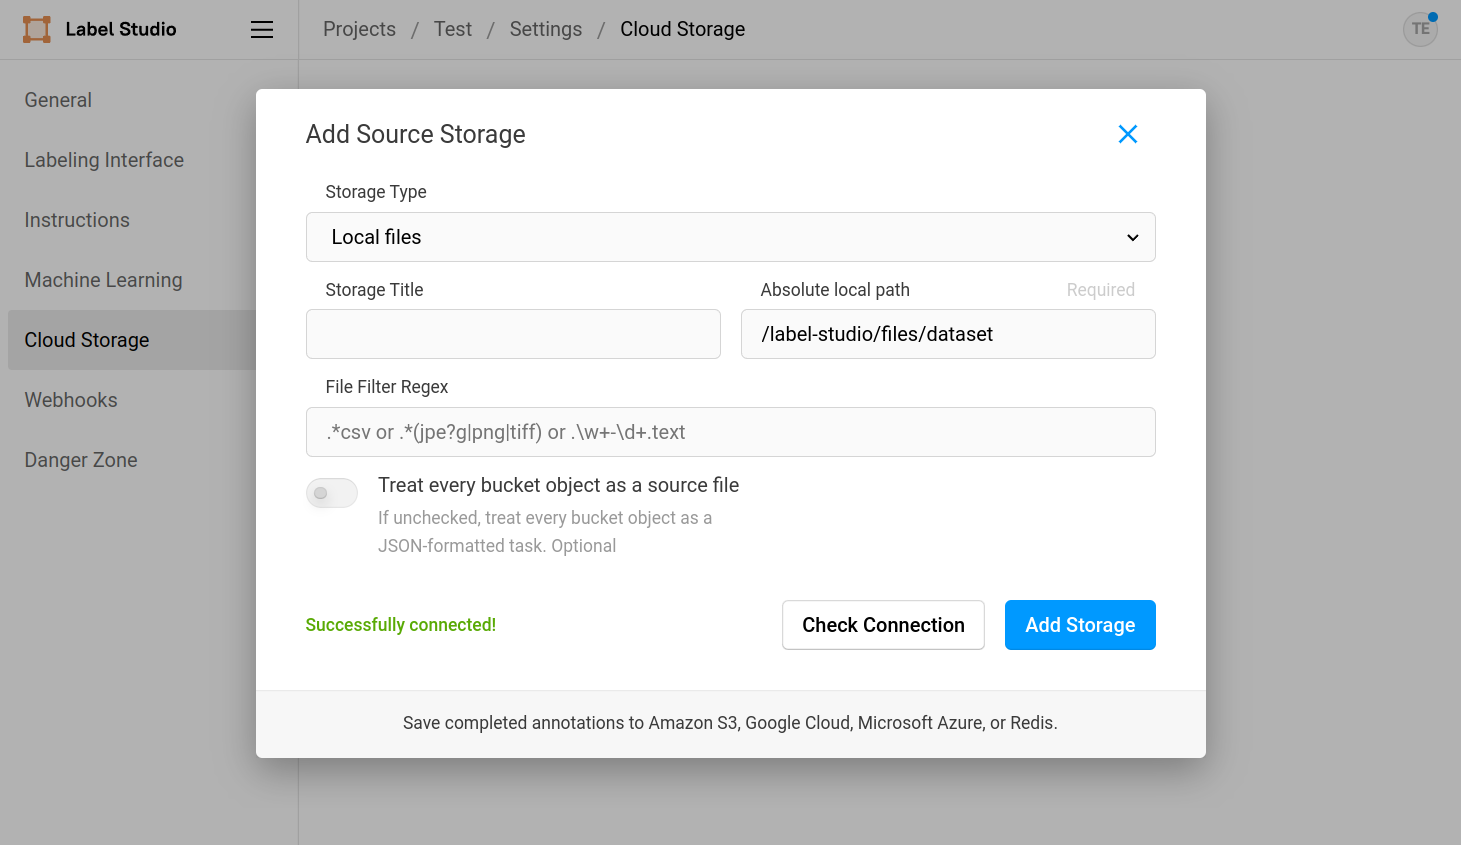
We are now ready to load our data! Please don’t click at Sync Storage button nor other buttons that are not clearly explained in the post.
JSON File
The next step is to create a JSON file with the data we want to label.
Following the example from Data Structure to see how our data is structured,
and the key value $my_image from the Image component in the Labeling configuration,
we can create a JSON file with the following structure:
[
    {
        "data": {
            "my_image": "/data/local-files/?d=dataset/1.jpg"
        }
    },
    {
        "data": {
            "my_image": "/data/local-files/?d=dataset/2.jpg"
        }
    },
    {
        "data": {
            "my_image": "/data/local-files/?d=dataset/3.jpg"
        }
    }
]
Notice how we append the path /data/local-files/?d= to the path of the file,
as well as the name of the directory where the files are located (dataset in our case).
We can save this file as data.json where we want, we are almost done!
Load JSON File
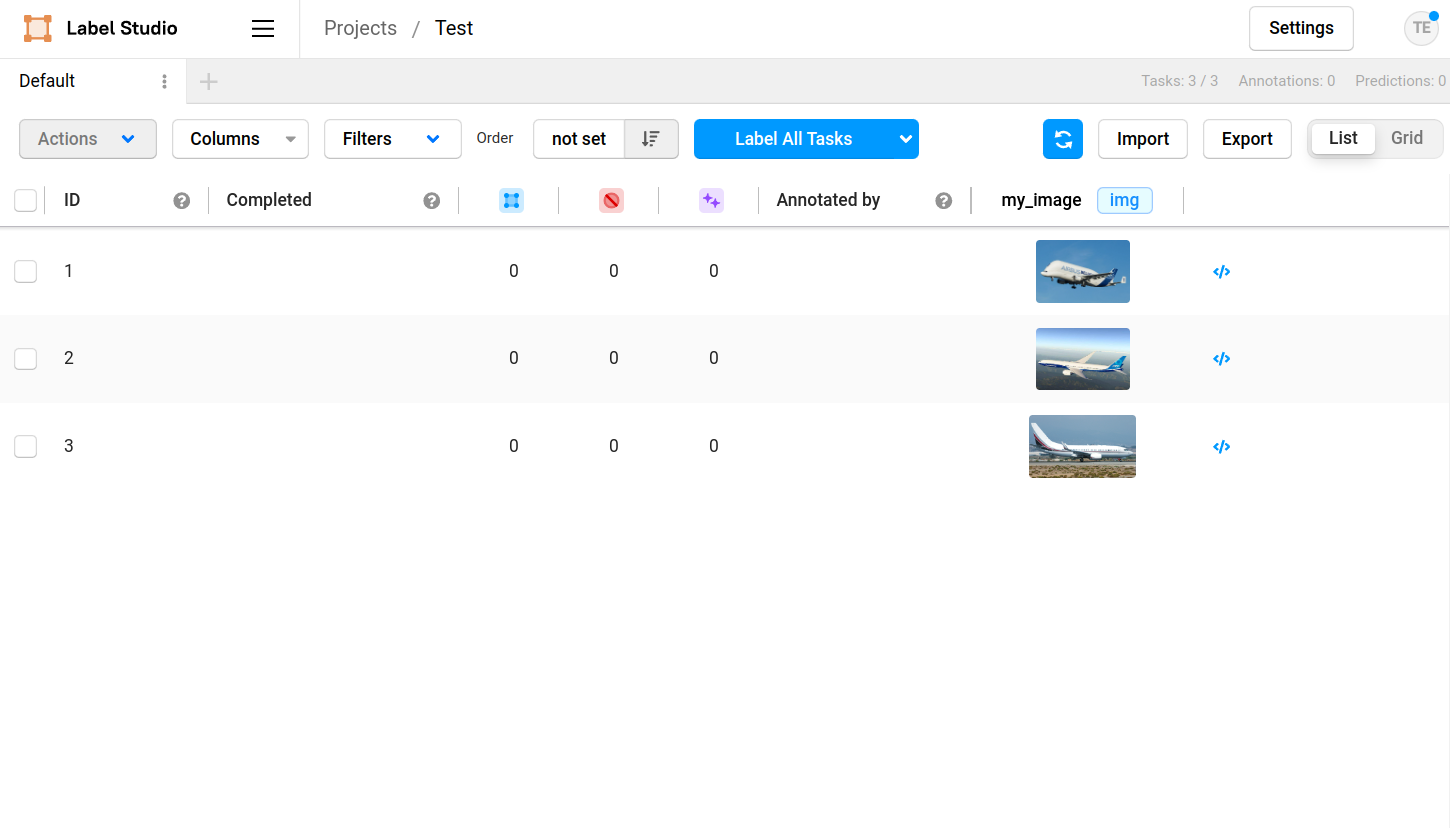
Finally, we can load our JSON file in the Label Studio project.
Go to the project initial page, click Import button and drop the data.json file,
click again Import and we will see that the data is loaded, yay!
We should see our tasks in the project initial page, ready to be labeled!
Note how every entry in the data.json file is a task in the project.
Conclusion
In this post we have seen how to load data from a JSON file in Label Studio,
configuring the Label Studio server to serve the files from a **local directory.
This is a very flexible way to load data, as we can load any kind of data,
and we can also load data from cloud storages following the same logic.
If we plan to load data from cloud storages,
we will need to setup the cloud storage in the Label Studio project configuration
for the correct cloud storage type. Note that depending the cloud storage type,
we will need to prepend a different path from /data/cloud-files/?d= to the file path.
References
You can check the following links for more information about running Label Studio and loading data: